I'm so glad that part 1 was so helpful! Hopefully you will take the plunge and open a store. I was on the fence for the past year and I have been blown away with the response to my store! Now on to part 2!
Creating Your Files

When creating files, I use powerpoint {I know that sounds kind of weird, but it's AWESOME!} I got this tip awhile back from a fellow blogger. Unlike word, or other word processing programs, it allows you to control the layout of your file. You can move pictures and text quite easily. I have a Mac and this is the closest thing I've found to Publisher {love this program & makes me miss a PC}. I recently found this tutorial on Extra Special Teaching! It gives a great walk through with how to use PPT. The only thing this tutorial didn't include was getting started. When you open up PPT, go to File-->Page Setup. On the pull down choose "Custom" Change your Width: 8.5 and Height: 11 {for portrait, if you want landscape flip the numbers}, then just click ok. It will prompt you that you're paper size exceeds printing area - just click ok {NOT FIX}

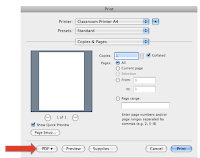 Both TpT & TN accept the regular types of files (word, excel, pdf, etc). However not everyone has these programs installed on their computer. It's usually best to use pdf. If you have a Mac, you're in luck! When you have your file completed go to File-->Print-->PDF (tab at the bottom)-->Save as PDF. {My files go to my desktop, but they may be placed in your documents instead}. If you have a PC, Primo PDF is a great program to use. It's also a really good idea that you use PDF because **MOST** places that you purchase clipart require that you sell your files in a flattened format. This basically means that your file is one layer and someone can't right click and copy/save the image from your file. PDF ensures that your file is flattened, programs such as word, excel, and powerpoint aren't. Someone could open those files - save the images and use them without properly paying for them. You also don't want people modifying what you created! Part 3 of these posts will include ways to ensure others can't make changes to your PDFs, as well as making them so that people can personalize them {& some other goodies}!
Now you need to jazz up your file {who doesn't like those cutesy graphics} I create my files using digital papers, frames, and clip art. You first want to find a store that offers inexpensive clip art that allows for commercial use {Yes even selling in a teacher's store is considered commercial use} **Before you buy, make sure you read and understand the seller's terms for their clipart! They all vary so much! If you aren't clear - email them! Also if you don't see anything about using for teacher files, ask them, most stores don't usually include this in their written terms, but will give you permission. The main things you want to look for:

- allow commercial use {read these terms carefully}
- whether you have to give credit or not {some you don't, some you have to have a link, some you just have to mention it's theirs}
- can you alter the image {change color, increase size}
- whether you have to purchase an additional commercial license to resell items
- if the file needs to be in a flattened format *see section below about this & pdfs
I have so many sets from different stores, that it is a *must* to keep them organized. I keep all my clipart in one folder, but I have individual folders for each store's clipart. Along with the clipart, I keep a copy of their terms & conditions, as well as their store logo. When I create files to sell {or giveaway}, I include a page giving credit {with clickable links} to all of the stores whose clipart I used to make the file {see pic to the right}. Make sure that you follow the store's terms. They work really hard creating all of those cute graphics!
Where To Get Clip Art, Digital Paper & Frame
Where To Get Clip Art, Digital Paper & Frame
At first, this was the hardest part for me to create files to share. I struggled to find clipart that allowed me to use on products I was planning to sell. After some help from friends and digging around I found some really great artists! Etsy is great for locating inexpensive clipart! The stores also run special like buy 2 sets get 2 sets free {can't beat that!} Teachers Notebook also has a section that has teacher friendly clipart. Here are a few of my favorite stores!
Saving Files
 Both TpT & TN accept the regular types of files (word, excel, pdf, etc). However not everyone has these programs installed on their computer. It's usually best to use pdf. If you have a Mac, you're in luck! When you have your file completed go to File-->Print-->PDF (tab at the bottom)-->Save as PDF. {My files go to my desktop, but they may be placed in your documents instead}. If you have a PC, Primo PDF is a great program to use. It's also a really good idea that you use PDF because **MOST** places that you purchase clipart require that you sell your files in a flattened format. This basically means that your file is one layer and someone can't right click and copy/save the image from your file. PDF ensures that your file is flattened, programs such as word, excel, and powerpoint aren't. Someone could open those files - save the images and use them without properly paying for them. You also don't want people modifying what you created! Part 3 of these posts will include ways to ensure others can't make changes to your PDFs, as well as making them so that people can personalize them {& some other goodies}!
Only 1 more part to go!! I'll be posting the last part this Friday. Tomorrow I'm super excited about Tech Tip Thursday - it's one you don't want to miss!!