photo border_zpsru85kpjh.png
Showing posts with label technology. Show all posts

Thursday, August 2, 2012

Tech Tip Thursday - Sumdog! Best Math Site!


I just realized it is Thursday (already!) Where are my days going?!?! I apologize for having 2 posts in one day, but I've missed a few tips and I need to catch up


Today's tech tip is the website Sumdog! I heard about it from a fellow blogger and I swear by it! Hands down the best math website! It's a math website that allows students to practice math concepts in fun game formats! To sign up and play the games is absolutely FREE....however they do have a reporting section that will give you details {reports} about how your students are doing {and what they are struggling with}. I'll be honest, I have only used the free features.

Teachers can sign up and then setup their class with individual logins for each student. I am always weary about entering my students' names into online programs. I only entered their first name and last initial. It generated passwords for each student. It's a very simple process and it's super easy to go back and add new students.  Students can play as guest, however I don't recommend this because they miss out on some of the features.


 The students are able to choose which concept they want to work on. The choices are place value, addition, subtraction, multiplication, division, fractions, or algebra type equations. Then they can even choose which skill they want to focus on and level. I have tried to figure out how to set these particular skills so that students could only work on skills that I have set, however I haven't been able to figure it out. I can set up competitions and set the skill level there.  I'm hoping that this will be a feature they add in the future. I don't want my students to choose easy concepts, nor ones that they would struggle with.

Students then choose how they are going to play: against the computer, a random person, or a classmate. This is the best part of the site! The students get such a kick out of playing against each other and they can be playing the same game but working on different skills and levels. I even jump on a computer from time to time and challenge the kids...they really get a kick out of it.

Finally the students choose which game they want to play. There are some really fun ones! My favorite is junk pile. You have to answer questions and then pile up junk in the junkyard, but be careful or your pile could fall over.  There are about 20 games in all that keeps a variety of interest in mind.

As the kids play they not only compete against one another, but they are racking up points {coins}. The coins allow you to purchase different clothes and accessories to dress your character. They also have different animal levels. My kids really got into these rewards. My kids were so into this site that they would call each other so they could challenge one another from home. It was such a great way to get kids to memorize their facts {but in a fun way!} This website is one of the sites my kids during our Guided Math rotations.

Thursday, July 19, 2012

Tech Tip Thursday - Word Ball


Word Ball is one of our favorite apps on iPad! The great news is this app is available for Droid and Nook users as well, it ranges from a free version to 1.99! It is similar to Boggle - but on speed! The balls {letters} bounce around the screen and you must create words by tapping on the balls. Words are based on a leveled point system, the more challenging a word is, the more points it receives! It also receives points for what letters are used - vowels get the smallest amount of points, but letters like Q and Z offer the most points. As time goes on the balls {letters} you don't use shrink and eventually disappear - making it more challenging to create words. Words also have to be at least 3 letters long. If a words is misspelled, it will let the play know and not award any points. When the game is finished, students can review the words they created. This app is perfect for your word work station! It is appropriate for students of all ages, even I enjoy playing it. It naturally lends itself to having students focusing on spelling patterns.


You could have different variations of this game to make it more interesting & challenging:
  • Play regular - allowing students to create any words
  • Create words only using a certain spelling pattern
  • Each word they create they must create a word that rhymes with it
  • Only words that begin with a certain letter
  • Only words with a certain theme or subject {vocabulary}
  • Class challenge - by keeping track of students scores

WARNINGS: The program is set up to be able to play against others, however the option must be setup. Students could potentially try to get in and change these settings, so a discussion about this may be necessary. Also on the opening page, there are options to buy different versions. It is important to make sure you have your settings in place that a password must be used to purchase apps! The free version has banner ads, as we know you never know what you are going to get with the ads!

Monday, July 16, 2012

Monday Made It! Lots of Goodies!

It's been another busy week! I've gotten several projects done! As well as finished 1/2 the book, How The Way The Brain Learns. Very, very interesting book!


Before
After
My first project was part of my trash-to-treasure scavenger hunt! I found this chair at Goodwill for only 10$ It had a hideous green & silver print {and under that an ugly 70's brown print}! I knew I could fix it up and it would match perfect with my craft room. I stripped the cushion of it's ugly fabric, as well as the foam {it was stained and just nasty} On my long to do list is to make a bench & seats from plastic crates. I decided to go ahead and buy a foam egg carton mattress pad so I could use with all 3 projects. I covered the cushion with a fabric that goes perfect with my craft room. My husband had to spray paint the chair {I'm not allowed near spray paint...it's a long story...but my last 2 projects I've some how jammed my finger and it's still in pain} I'm thrilled with the results. The chair will go perfect with my work table that I bought from IKEA.


For my classroom, I made these brain breaks & classroom cheer cards! I found them on this adorable blog - I printed them on cardstock, then glued them to a colored piece of cardstock, finally pouch laminating them. They are super {super} study and should last me several years. I put them on a ring and added some ribbon {you know how I love ribbon}. After reading The Way The Brain Learns {well 1/2 of it and still reading - so interesting!} I know that giving the brain a break is so important! There are so many! As I use them, I plan to put a check mark with a visa-vis so I know I've already used it. The cheers are fun too! It's a great way to break up the day and get the kids excited.


I also made my W.I.S.E. Crew folders {similar to Einstein's club or Mastery club}. I'm going to save my bulletin board for the student recognition piece {I will have 3 different sized owl for each subject to show when students have completed 5, 10 & 15 q's}. I will have these folders out near our computers for students who finish early. The questions will be placed in page protectors inside the folders, I will also have several copies of the answer sheet in the folders pocket. I decided on the folders, so they would take up less space. I'm super excited about this program - I just wish I had thought of it last year! It's the perfect set up for early finishes & enrichment!
Now go see what everyone else is up to on Tara's blog for Monday Made It!

Friday, July 13, 2012

Setting Up A Teacher's Store - Part 3


This will be my last post on teacher's stores...until I find more goodies to share. This post also won't apply to everyone because you may not have this program I'm going to share with you. However....check with your school district (school library), it may be provided and you just didn't know you had access to it! Most schools purchase this software as part of a package - so it doesn't hurt to ask.


The program I'm talking about is Adobe Acrobat Pro. This program is different than Adobe Reader (which just lets you view the file), this one actually allows to create, edit and do amazing things with your file! I have version 9, but 10 or X is the most current. As teachers we get a HUGE discount.

I've only discovered a few tricks I can do with this software, I'm sure there a ton more! So lets get to it!


Adding A Link
Like I mentioned in my previous post, I love to use PowerPoint to create my files, however when I convert them to PDF, I loose all of my links. This is really important for those clipart stores that require a clickable link back to their store. It's super easy too! Open your file in Adobe Pro, highlight the text you want to hyperlink, right click and choose create link. A box will appear - the picture shows the settings I choose,  I prefer to not have a visible box around my links.
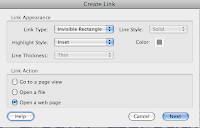
Click on "open a webpage" and another screen will pop up. You just enter the url and hit ok! Simple right?!?!  You can also set it up a link to email you. Follow the same directions above, but for the url enter "mailto:youremail address".  If you want to link an image, hover over the image until the cross-hairs appear {top left corner of the image} Click and highlight the entire image. Once it's highlighted right click and follow the steps above again to create a link! This makes it so much easier to not have to type out urls within your file, and definitely makes them look cleaner.


Adding Editable Fields
Have you ever created a file that really needs to be personalized for the buyer? This is perfect for binder covers, lesson plan templates, awards, etc. With Adobe Pro, it's super simple to add editable fields. Again open your file in AP {Adobe Pro}. On the top right click on Tools, then click on Forms. Under the form section, click on Create. A number of screens will pop up, 1st choose "Use current document", 2nd "Use current document". It will automatically go through your document searching for places a form field should be. Be careful - sometimes it recognized and places a field where one shouldn't be! Just right click and delete it. On the right hand side of your screen Task menu will appear. From here you can add a new field to create an editable text field. Just place the field wherever you are wanting the person to be able to change the text. When you place the box, there will be a link to properties. 
 

In properties, I stick to the General and Apperance tab. Under general you can select if the field is required or not, also if it is visible. Under appearance, you can choose font and size that the field will use so that it blends with the document. Once you have your fields created and you've set the properties - you're done! Just save it! Now your buyers will be able to customize and enter their information into those fields! {Here is a video to give you a visual}


Security
AP is amazing, so amazing that I can take a PDF and start editing it! I can add text, change things around, etc. Most people have the misconception that PDF means that no changes can be made and the file stands as is. This is a problem if you create similar products. Someone could buy one then make changes and recreate all of the others, then you're left without those sales! However AP also allows you to secure your document so this doesn't happen. When your PDF is finally done, you've added link and fields {if it's a customizable document} then you're ready to add your security. With your document opened in AP, click File > Properties. A box will appear, under the description tag, make sure you name is listed as the author. Then click on the Security tab. Under the pull down screen for security method, choose password security. Another screen will pop up - this is how I set my settings. 
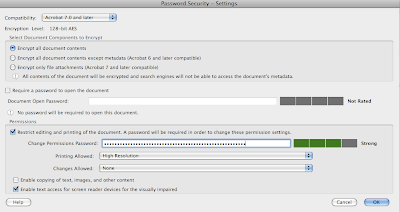
The first thing I click on is "Restrict editing, printing...." choose a password that you can remember but that is strong! Under printing, choose high resolution {you don't want someone to buy your file and can't print it}. Under changes allowed, I choose none - that means text & images can't be selected, they can add text/images, or add/delete pages - basically they can't change my document in any way shape or form. Now if you added text fields for your document to be editable, you will have to choose "filling in forms" under changes allowed - or they won't be able to edit the fields ;) I leave copy text/images unchecked, but I do allow for screen reader devices. Click ok and another screen will pop up prompting you to enter the password again to confirm they are the same. Make sure you save - otherwise your security settings don't save!


That's it folks! The little tips & tricks I've learned so far on this adventure of opening my store. I'll say it again - I am no EXPERT, this is just what I've picked up through my searches and trying to teach myself along the way. There may be a better way ;) I hope this helps ya'll and you decide to take the plunge! Do it - open a store and share your wonderful ideas!

Thursday, July 12, 2012

Tech Tip Thursday: Wonderopolis- Have you ever wondered?


I'm so excited to share today's tech tip with you! It's a website called Wonderopolis! It's a wonderful website that answers all of your wondering questions {PERFECT for our curious students}! Like....Why do you get goosebumps? or Why do skunks stink? A new wondering is presented every day and it has already answered hundreds more that are archived on their site. There are so many ways to use this site! The question of the day is posted on front page of the site, however there is a search button, as well as a categorized list of questions that are already answered {bottom right hand side of the page}!

I love the way the site guides children to find the answer to the stated question. It doesn't come right out and give them the answer {so important!!!} There is a video that introduces the topic to get the students thinking about the question & topic. Then there are a few short paragraphs that give the students background information and facts. Students must draw their own conclusions based on the information provided {Love it!} Wait..... it gets better! The site then provides activities that the students can try that are related to the question. These activities range from a small experiment to taking a virtual field trip. It also provides vocabulary that the students should be familiar with in regards to the topic. Finally, it gives the students an option to extend and explore with their "Still Wondering" section. As a teacher, I couldn't ask for a better set up for my students to explore!! Hands down one of the best exploration resources available - and it's FREE!!! It's not surprising that it's such a great resource considering who is behind it! Wonderopolis is created by National Center for Family Literacy, as well as Verizon Thinkfinity.  Along with their website, wonderopolis also has an app for both Apple & Android.

I found this site last year at a conference. I knew I had to do something with it besides just letting my students get on it every so often. It finally came to me the other day! I have been wanting to have an Einstein's club or Mastery club of some sort - but I didn't want my students just looking up basic facts, I wanted it to be meaningful to them {insert Wonderopolis}. I think activities like this are not only good for students who finish early, but it promotes autonomous learning and gives the students the power to be in charge of their learning through choices. I wanted to jazz my version up so I came up with the W.I.S.E. crew. Wondering, Investigating, Seeking, & Exploring  {perfect words to describe Wonderopolis!} I have it set up very similar to other mastery clubs. It's broken down by subjects {Math, Language Arts, Science, Social Studies, & Misc.} with 15 questions in each section. I plan to have different levels of mastery based on the number of questions they complete. Each level will earn the students a different recognition {Hall of Fame}. They will also be listed on our class website. I'm not going to *require* the students to complete the tasks, but I'm going to encourage and recognize those who do. I will have it set up where students can complete these tasks at home and when they have finished all other work. I am beyond excited about this program! I've done all the had work for you - you can grab my program here!


Thursday, July 5, 2012

Tech Tip Thursdays - Student websites


Have you ever built a website? If you have...then you know the excitement you had the first time you built one {You're in complete and total awe that you were capable of building it!} Can you imagine how your students would feel if they had the chance to build one? If you haven't built one before, it's much easier than you think! There are some really great programs out there!

 Last year, I had a tech club that met after school. One of our first tasks was to create a website that served as our technology portfolio. The kids were beyond excited to be able to build one! Out of all of the projects that I taught, I have to say the kids were most excited about building a website. {The cool thing was that they continued working on their site even after our club ended!} This year I plan on having each of my students in class create one to serve as their project portfolio, but also so they may blog on their individual accounts.

I prefer to use the free program from Weebly. There are 2 parts to Weebly, regular service and the education division. If you sign up under the education division - you get a ton of extra services that are perfect for a classroom setup. You can create up to 40 student accounts, as well as multiple classes. {WOWSERS!!} Your account will be able to oversee and control all of your student accounts {the regular service doesn't allow for this!} You have the ability to make your students' pages public or private {so you could just keep the website within your classroom}....and you can even password protect it {how cool is that?!?}. Another feature that I like about Weebly, is that it's a drag and drop design program. You and your students don't need to know HTML or any other type of code. It's very user friendly to be able to design {here's a great intro video to the site} But hands down the best thing about weebly is it's free and NO ADS!!!

Just a few ideas to use Weebly in your classroom, besides using it for just a website/blog:
On another note, something that is very near and dear to me...it might seem like common sense to us, but we need to remind our students that everyone around the world can see what we put on the internet. We need to have discussions with our students about what is appropriate to post online and how we must keep ourselves safe by not posting information that identifies who we are. 

Wednesday, June 27, 2012

Cooperative Learning Tools - Training, Training & more training

I'm sorry for being MIA, I packed most of my summer training in the past week and this week! My head is still spinning from all of the wonderful ideas I got. I attended trainings on iPads, writing with Barry Lane & Gretchen Bernabei, and Kagan cooperative learning. They were all fabulous!!

I really enjoyed the Kagan training. I have never been to an official Kagan training before, but it is all we used during undergrad. I was fortunate to have a professor who is a Kagan trainer. {If you have a chance - I highly suggest going!} The one I went to was a 2 day conference that focused on ELL's.  It is amazing how well cooperative structures lend themselves to students acquiring a new language!

While I really love Kagan and all of their materials, a lot of their things are EXPENSIVE!!! I highly suggest to spend the $$$ on the trainings & books - they're worth it. However, for tools, I borrow their ideas and come up with alternatives.

Timers & Selectors
For timers, I love to use online-stopwatch, they have very cute timers! They even have an interval timer, that you can set up for teams and have 4 different timers going {similar to Kagan's bar timer} There are also tons of timers for Smartboards.

Selectors are another really fun tool! If you have your students set up in groups of 4, I always have each student numbered {#1-4}, with these selectors, you can either put students names or just the numbers 1, 2, 3, & 4 {similar to how Kagan's work}
  • Random Name Selector - you can either put your Ss name in there, or you can just put #1-4 and it will select one. It also has a stopwatch on the same site. The best part, it saves your student's names!
  • Dart Selector - is another cute one, but it doesn't save your list of names or numbers, so you may have to keep it up on your screen at all times. 
  • Super Teacher Tools - You can create a class (either by name/#) and use it as a name selector, but you can also use it to randomly creates students into groups. It saves your info too!
  • Random Name Picker - This will allow you to enter student names/#'s and it uses a slot machine to choose the name/#.
  • Stick Pick - iPhone app. This one is pretty fancy and keeps track of correct responses by students. 
  • Kagan also has some apps that are pretty inexpensive {2.99 each} for selectors & timers!

I have lots of ideas for some of their other tools - and I will share with you as I make them! Here are some other great resources that I have found that are either free or very inexpensive!
  • Cooperative 365- A blog dedicated to cooperative learning and has amazing resources!

Don't forget to enter my giveaway - there are LOTS of great prizes!!!!


Thursday, June 14, 2012

Tech Tip Thursdays


Seeing that I just graduated with a degree in  Educational Technology...I thought I would start sharing some helpful technology tips on Thursdays. I will be posting tips for all spectrums of technology! The tips will range from reviewing apps to fun Web 2.0 tools, to ways to integrate technology in your classroom to tools to help you manage your classroom, and everything in between! I hope these tips will be helpful and you can use them in your classroom.

TIP #1: Word Clouds

Today's tip is a free online tool that has so many cool functions to it, they're called word clouds. Word clouds take words that you have entered and create a "cloud", or shape, using those words in different fonts, colors, size, direction, etc. They create a great visual that can be used in so many ways in your classroom. 

Wordle is the most common program used for world clouds. I like it because it is very simple to use and you don't need to create an account or have additional plug-ins installed. You just type in the words you want to use to create your word cloud. The more times a word is typed, the larger the word becomes. However, it doesn't save your text so if students aren't careful they can loose everything they've typed. For younger kids I suggest having students type in Word and copy+paste their words into Wordle. You can also create a Wordle for an entire website by entering the url. Once you have your text entered you can begin to play around with the fonts & colors. Unfortunately your only option is to print or create a screen shot of your word cloud. It doesn't allow you to save the image.

I like to use Tagxedo, it's another free program that creates word clouds. It works similarly to Wordle, but it allows you to save your image and choose a shape. You also only have to type the word once and it will fill it in throughout the image. I used Tagxedo to create the word cloud below.


So what can I use a word cloud for?
I've used word clouds for many things! Here are just a few! 
  • Get to know you - This is one of the first "tech" thing my students do at the beginning of the year. It's a way for me to get to know the students and they LOVE this activity. You can take the image and do many things with it. I let them put it on their webpage, which is their tech portfolio.
  • Notebook covers - These make great notebook covers. Your students can type in all the words that come to mind for a specific subject (for example math: division, times, fractions, money, etc). They can use these word clouds as their notebook covers.
  • Main Idea - Students struggle with this concept, but you can use wordle to help you get the message across. Have a passage that you can copy the text from. Have students read the passage, then use wordle to paste the story in the program. The words that were used the most will be larger. This lets students focus on what the main ideas for the story are. (This won't work in the Tagxedo program)
  • Word Banks - word clouds are a unique way to give students a word bank for their writing. 
Here are 52 other ways you can use word clouds!

How do you use word clouds? I would love to hear about it! Until next Thursday....

Sunday, June 10, 2012

I'm back & a few of my favorites...

WOW! I'm finally back! This year has been a complete whirlwind for me! I had hoped to be able to juggle teaching, grad school, family ~ and be able to sneak a few posts in here and there. Unfortunately, this wasn't the case! My last semester was CRAZINESS! I took 12 hours (way too many hours!) - But (after what seems like forever)....I graduated with my Masters in Educational Technology! Wooo hooo!!


We have officially been out of school a little over a week now. I'm trying to decompress from this crazy year. As I do, I can't help but reflect back over the year. Although it was crazy {3rd time I've used this word so far - can you tell it was a really crazy year!}, I had some really great moments with my class. I thought for my next few posts I would share some of my favorite lessons from this year!


This year, our principal had us decorate our door for Black History month with highlights/facts of a famous African American. I will be completely honest, I wasn't thrilled about this idea! Any other time I would have been on cloud nine to work on a project like this, but as I've said it was such a busy time (and we were given very short notice about the project). We were working on a poetry unit at the time. Our class ended up drawing the name of the author/poet/activist, Alice Walker. She wrote The Color Purple, among many other pieces. She also wrote a children's book (that fit perfect with our poetry unit), There is a Flower at the Tip of My Nose Smelling Me. Seriously, couldn't have been a more perfect book, the imagery and personification in this book is amazing! I decided to have the kids write poems inspired by this book. They truly blew me away with their words!

As we continued our poetry unit, we discussed the characteristics of poems and how poems are read. I decided to record the students reading their poems so they could really hear how they sounded. I have used sound cloud for other recordings, such as podcasts, so I decided to give it a try. They have an iphone/ipad app which was perfect. We used my iPhone to record each other reading our poems. Recording the poems, sparked an idea on how to share the poems. I didn't want to just share our poems, but I wanted to share what we had learned about Alice Walker. I wanted our door to be interactive! I have used QR codes, but had never created them. After a little research, I found they are extremely easy to create. You basically paste the link you want the QR code to be directed to and it creates the QR image. Super simple! My kids were blown away with how we could scan the code and it would take us to our recordings. We sent out an email to the campus with links to QR reader apps, so they would be prepared. The school really took to our ideas. It was so awesome to see other kids getting excited about our work through technology. Our little project also inspired others. A few teachers used QR codes as well to make their door interactive.


Some of our recordings:
Alice Walker's life
Alice Walker author
Alice Walker famous
Alice Walker's poem


I think this was one of my favorite lessons because it just "happened". I didn't plan it out, it just sort of came together like a puzzle. I honestly think that my best lessons happen this way ;)


This solidifies my belief that technology doesn't need to replace our teaching, it needs to supplement it. It also proved once again that using technology through example is much more powerful than a professional development on technology applications. Teachers must be vested
in the idea, and I feel that when they are forced to
attend a training, they aren't as accepting to bring it into their classroom. I hope that more of my projects will inspire teachers to bring more technology into their classroom.


I promise I'm back (for good) and I look forward to blogging again!


 photo border_zpsru85kpjh.png