photo border_zpsru85kpjh.png

Tuesday, July 31, 2012

More MATH - CGI

I'm currently attending a 3 day CGI {Cognitively Guided Instruction} training (with 2 additional days later in the year). I signed up for the training so that I had a better understanding of what my students were coming to me with... I had always thought that CGI was ONLY for the lower grades (our 1st/2nd grade use CGI) - After today, I'm realizing that I can easily apply this philosophy to my math instruction. The basis of CGI is that students are allowed to investigate and discover their own methods to solve problems. They extend their strategy database though the modeling of other students {not the teachers}. I'm not going to lie....as a 3rd grade teacher - this FREAKS me out! Problem solving is so crucial in 3rd grade and this is a HUGE adjustment to how I currently teach problem solving. This book will definitely take me out of my comfort zone. I am going to try it and see how it works in my classroom. On another note....our instructor is very knowledgeable and has so many wonderful math resources. You can see her teacher store and wonderful math activities! She has great center activities and they are very inexpensive - go check her out! Here is her website with more freebies and resources.

Along with the training, we're also doing a book study with the above book. I would love to bounce ideas off of anyone who has read or who implements CGI in their classroom - especially in the upper grades! Here are my thoughts & questions so far with the first few chapters of this book:

Chapter 1:

  • Students don't naturally solve problems the way that we do. They follow the action of the problems, similar to a recipe to solve the problem. For example Alyssa has 5 erasers. How many more erasers does she need to have 11? We would solve this problem by subtracting 5 from 11. However kids would take the 5 and count up till they got to 11. 
  • Kids already have a knowledge base for mathematics, we need to tap into this background knowledge.
  • Students should be allowed to discover their own strategies to solve problems. They will learn different ways to solve by sharing with their peers. Teachers should not model and impose our thinking on the students.
  • Children don't have to be taught specific strategies to solve particular problems.
My questions:
  • Where should we start with upper students? The instruction videos show that you allow students to use manipulatives and it seems they start very small. Should we revert to the basics with older students as well?
Chapter 2: Here is a organizer that explains the different types of problems.
  • Problems are classified based on the way children think about the problem.
  • Addition/Subtraction are separated into result unknown (most common), change unknown, and start unknown (hardest type of problem). The problems all have an action that happens in the problem (something is added or taken away)
  • Part-Part-Whole & Compare problems have no actions, and instead are based on relationships.
  • Problems can be more challenging or rigorous by changing the wording to past tense or numbers within the problem that don't represent a set number of objects (such as weight)
My questions:
Should the structures of the different types of problems be explicitly taught to students? How would this be accomplished if the teacher shouldn't be modeling problems?

Monday, July 30, 2012

Monday Made It - It's all about MATH

 It's that time again! Time for Monday Made It over at 4th Grade Frolics.  I have to be honest, I have been taking a little break trying to sneak in a few trips here and there before the summer ends. I am starting to freak out that we only have 20 days left! Where did the time go? Even though I've been running around with the kids...I managed to get some things done this week.


This week my focus was completely on MATH! I've had lots of questions about my T.I.M.E.R. unit and what I use for each section. I have made a ton of games & other activities from fellow bloggers. I also borrowed a few idea and created these:

First up...I finally made math towers. It has been on my to do list forever. I took the advice from another blogger and used the plastic cups so they would last longer. I found the container at the Dollar Tree and it is perfect to hold the cups.


Next I made Math Fact Jenga! This will go perfect with my guided math rotation (Math Facts) I grouped the facts into 4 groups (ex. 0,5,10 facts) Then I assigned each group of facts a colored star. I used file folder stickers and labeled the different sides of the wood so that each side would have a math fact from each group. This allows me to have flexibility and to differentiate the instruction. As I introduce the facts, I can have students work with just that colored star. As we progress I can assign more than one or have them do all 4 stars! I also thought I could have them say the 4 numbers sentences in the fact family for a specific colored stars. I love how these turned out and I know my kids are going to love them!


Finally....I sat down and worked on my Math Interactive Notebooks for next year. Last year I wasn't as organized as I would have liked to have been with them. My notebooks won't be the traditional version where specific things go on left or right. However they will be jammed packed with resources that range from notes to interactive activities the students can refer back to. As I organized all of the activities I typically do with my students - I figured I would just make it a file to share with others! You can get it here! Here are just a few pictures of what it looks like so far! Check back this week - where I'll explain how I use the notebooks and how I've changed how I organize them!


Thursday, July 19, 2012

Tech Tip Thursday - Word Ball


Word Ball is one of our favorite apps on iPad! The great news is this app is available for Droid and Nook users as well, it ranges from a free version to 1.99! It is similar to Boggle - but on speed! The balls {letters} bounce around the screen and you must create words by tapping on the balls. Words are based on a leveled point system, the more challenging a word is, the more points it receives! It also receives points for what letters are used - vowels get the smallest amount of points, but letters like Q and Z offer the most points. As time goes on the balls {letters} you don't use shrink and eventually disappear - making it more challenging to create words. Words also have to be at least 3 letters long. If a words is misspelled, it will let the play know and not award any points. When the game is finished, students can review the words they created. This app is perfect for your word work station! It is appropriate for students of all ages, even I enjoy playing it. It naturally lends itself to having students focusing on spelling patterns.


You could have different variations of this game to make it more interesting & challenging:
  • Play regular - allowing students to create any words
  • Create words only using a certain spelling pattern
  • Each word they create they must create a word that rhymes with it
  • Only words that begin with a certain letter
  • Only words with a certain theme or subject {vocabulary}
  • Class challenge - by keeping track of students scores

WARNINGS: The program is set up to be able to play against others, however the option must be setup. Students could potentially try to get in and change these settings, so a discussion about this may be necessary. Also on the opening page, there are options to buy different versions. It is important to make sure you have your settings in place that a password must be used to purchase apps! The free version has banner ads, as we know you never know what you are going to get with the ads!

Monday, July 16, 2012

Monday Made It! Lots of Goodies!

It's been another busy week! I've gotten several projects done! As well as finished 1/2 the book, How The Way The Brain Learns. Very, very interesting book!


Before
After
My first project was part of my trash-to-treasure scavenger hunt! I found this chair at Goodwill for only 10$ It had a hideous green & silver print {and under that an ugly 70's brown print}! I knew I could fix it up and it would match perfect with my craft room. I stripped the cushion of it's ugly fabric, as well as the foam {it was stained and just nasty} On my long to do list is to make a bench & seats from plastic crates. I decided to go ahead and buy a foam egg carton mattress pad so I could use with all 3 projects. I covered the cushion with a fabric that goes perfect with my craft room. My husband had to spray paint the chair {I'm not allowed near spray paint...it's a long story...but my last 2 projects I've some how jammed my finger and it's still in pain} I'm thrilled with the results. The chair will go perfect with my work table that I bought from IKEA.


For my classroom, I made these brain breaks & classroom cheer cards! I found them on this adorable blog - I printed them on cardstock, then glued them to a colored piece of cardstock, finally pouch laminating them. They are super {super} study and should last me several years. I put them on a ring and added some ribbon {you know how I love ribbon}. After reading The Way The Brain Learns {well 1/2 of it and still reading - so interesting!} I know that giving the brain a break is so important! There are so many! As I use them, I plan to put a check mark with a visa-vis so I know I've already used it. The cheers are fun too! It's a great way to break up the day and get the kids excited.


I also made my W.I.S.E. Crew folders {similar to Einstein's club or Mastery club}. I'm going to save my bulletin board for the student recognition piece {I will have 3 different sized owl for each subject to show when students have completed 5, 10 & 15 q's}. I will have these folders out near our computers for students who finish early. The questions will be placed in page protectors inside the folders, I will also have several copies of the answer sheet in the folders pocket. I decided on the folders, so they would take up less space. I'm super excited about this program - I just wish I had thought of it last year! It's the perfect set up for early finishes & enrichment!
Now go see what everyone else is up to on Tara's blog for Monday Made It!

Friday, July 13, 2012

Setting Up A Teacher's Store - Part 3


This will be my last post on teacher's stores...until I find more goodies to share. This post also won't apply to everyone because you may not have this program I'm going to share with you. However....check with your school district (school library), it may be provided and you just didn't know you had access to it! Most schools purchase this software as part of a package - so it doesn't hurt to ask.


The program I'm talking about is Adobe Acrobat Pro. This program is different than Adobe Reader (which just lets you view the file), this one actually allows to create, edit and do amazing things with your file! I have version 9, but 10 or X is the most current. As teachers we get a HUGE discount.

I've only discovered a few tricks I can do with this software, I'm sure there a ton more! So lets get to it!


Adding A Link
Like I mentioned in my previous post, I love to use PowerPoint to create my files, however when I convert them to PDF, I loose all of my links. This is really important for those clipart stores that require a clickable link back to their store. It's super easy too! Open your file in Adobe Pro, highlight the text you want to hyperlink, right click and choose create link. A box will appear - the picture shows the settings I choose,  I prefer to not have a visible box around my links.
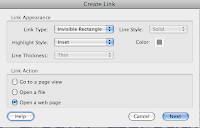
Click on "open a webpage" and another screen will pop up. You just enter the url and hit ok! Simple right?!?!  You can also set it up a link to email you. Follow the same directions above, but for the url enter "mailto:youremail address".  If you want to link an image, hover over the image until the cross-hairs appear {top left corner of the image} Click and highlight the entire image. Once it's highlighted right click and follow the steps above again to create a link! This makes it so much easier to not have to type out urls within your file, and definitely makes them look cleaner.


Adding Editable Fields
Have you ever created a file that really needs to be personalized for the buyer? This is perfect for binder covers, lesson plan templates, awards, etc. With Adobe Pro, it's super simple to add editable fields. Again open your file in AP {Adobe Pro}. On the top right click on Tools, then click on Forms. Under the form section, click on Create. A number of screens will pop up, 1st choose "Use current document", 2nd "Use current document". It will automatically go through your document searching for places a form field should be. Be careful - sometimes it recognized and places a field where one shouldn't be! Just right click and delete it. On the right hand side of your screen Task menu will appear. From here you can add a new field to create an editable text field. Just place the field wherever you are wanting the person to be able to change the text. When you place the box, there will be a link to properties. 
 

In properties, I stick to the General and Apperance tab. Under general you can select if the field is required or not, also if it is visible. Under appearance, you can choose font and size that the field will use so that it blends with the document. Once you have your fields created and you've set the properties - you're done! Just save it! Now your buyers will be able to customize and enter their information into those fields! {Here is a video to give you a visual}


Security
AP is amazing, so amazing that I can take a PDF and start editing it! I can add text, change things around, etc. Most people have the misconception that PDF means that no changes can be made and the file stands as is. This is a problem if you create similar products. Someone could buy one then make changes and recreate all of the others, then you're left without those sales! However AP also allows you to secure your document so this doesn't happen. When your PDF is finally done, you've added link and fields {if it's a customizable document} then you're ready to add your security. With your document opened in AP, click File > Properties. A box will appear, under the description tag, make sure you name is listed as the author. Then click on the Security tab. Under the pull down screen for security method, choose password security. Another screen will pop up - this is how I set my settings. 

The first thing I click on is "Restrict editing, printing...." choose a password that you can remember but that is strong! Under printing, choose high resolution {you don't want someone to buy your file and can't print it}. Under changes allowed, I choose none - that means text & images can't be selected, they can add text/images, or add/delete pages - basically they can't change my document in any way shape or form. Now if you added text fields for your document to be editable, you will have to choose "filling in forms" under changes allowed - or they won't be able to edit the fields ;) I leave copy text/images unchecked, but I do allow for screen reader devices. Click ok and another screen will pop up prompting you to enter the password again to confirm they are the same. Make sure you save - otherwise your security settings don't save!


That's it folks! The little tips & tricks I've learned so far on this adventure of opening my store. I'll say it again - I am no EXPERT, this is just what I've picked up through my searches and trying to teach myself along the way. There may be a better way ;) I hope this helps ya'll and you decide to take the plunge! Do it - open a store and share your wonderful ideas!

Thursday, July 12, 2012

Tech Tip Thursday: Wonderopolis- Have you ever wondered?


I'm so excited to share today's tech tip with you! It's a website called Wonderopolis! It's a wonderful website that answers all of your wondering questions {PERFECT for our curious students}! Like....Why do you get goosebumps? or Why do skunks stink? A new wondering is presented every day and it has already answered hundreds more that are archived on their site. There are so many ways to use this site! The question of the day is posted on front page of the site, however there is a search button, as well as a categorized list of questions that are already answered {bottom right hand side of the page}!

I love the way the site guides children to find the answer to the stated question. It doesn't come right out and give them the answer {so important!!!} There is a video that introduces the topic to get the students thinking about the question & topic. Then there are a few short paragraphs that give the students background information and facts. Students must draw their own conclusions based on the information provided {Love it!} Wait..... it gets better! The site then provides activities that the students can try that are related to the question. These activities range from a small experiment to taking a virtual field trip. It also provides vocabulary that the students should be familiar with in regards to the topic. Finally, it gives the students an option to extend and explore with their "Still Wondering" section. As a teacher, I couldn't ask for a better set up for my students to explore!! Hands down one of the best exploration resources available - and it's FREE!!! It's not surprising that it's such a great resource considering who is behind it! Wonderopolis is created by National Center for Family Literacy, as well as Verizon Thinkfinity.  Along with their website, wonderopolis also has an app for both Apple & Android.

I found this site last year at a conference. I knew I had to do something with it besides just letting my students get on it every so often. It finally came to me the other day! I have been wanting to have an Einstein's club or Mastery club of some sort - but I didn't want my students just looking up basic facts, I wanted it to be meaningful to them {insert Wonderopolis}. I think activities like this are not only good for students who finish early, but it promotes autonomous learning and gives the students the power to be in charge of their learning through choices. I wanted to jazz my version up so I came up with the W.I.S.E. crew. Wondering, Investigating, Seeking, & Exploring  {perfect words to describe Wonderopolis!} I have it set up very similar to other mastery clubs. It's broken down by subjects {Math, Language Arts, Science, Social Studies, & Misc.} with 15 questions in each section. I plan to have different levels of mastery based on the number of questions they complete. Each level will earn the students a different recognition {Hall of Fame}. They will also be listed on our class website. I'm not going to *require* the students to complete the tasks, but I'm going to encourage and recognize those who do. I will have it set up where students can complete these tasks at home and when they have finished all other work. I am beyond excited about this program! I've done all the had work for you - you can grab my program here!


Wednesday, July 11, 2012

Opening A Teacher's Store Tips & Tricks Part 2


I'm so glad that part 1 was so helpful! Hopefully you will take the plunge and open a store. I was on the fence for the past year and I have been blown away with the response to my store! Now on to part 2!


                                            Creating Your Files
When creating files, I use powerpoint {I know that sounds kind of weird, but it's AWESOME!} I got this tip awhile back from a fellow blogger. Unlike word, or other word processing programs, it allows you to control the layout of your file. You can move pictures and text quite easily. I have a Mac and this is the closest thing I've found to Publisher {love this program & makes me miss a PC}. I recently found this tutorial on Extra Special Teaching! It gives a great walk through with how to use PPT. The only thing this tutorial didn't include was getting started. When you open up PPT, go to File-->Page Setup. On the pull down choose "Custom" Change your Width: 8.5 and Height: 11 {for portrait, if you want landscape flip the numbers}, then just click ok. It will prompt you that you're paper size exceeds printing area - just click ok {NOT FIX}


 Now you need to jazz up your file {who doesn't like those cutesy graphics} I create my files using digital papers, frames, and clip art. You first want to find a store that offers inexpensive clip art that allows for commercial use {Yes even selling in a teacher's store is considered commercial use} **Before you buy, make sure you read and understand the seller's terms for their clipart! They all vary so much! If you aren't clear - email them! Also if you don't see anything about using for teacher files, ask them, most stores don't usually include this in their written terms, but will give you permission. The main things you want to look for:
  • allow commercial use {read these terms carefully}
  • whether you have to give credit or not {some you don't, some you have to have a link, some you just have to mention it's theirs}
  • can you alter the image {change color, increase size}
  • whether you have to purchase an additional commercial license to resell items
  • if the file needs to be in a flattened format *see section below about this & pdfs
I have so many sets from different stores, that it is a *must* to keep them organized. I keep all my clipart in one folder, but I have individual folders for each store's clipart. Along with the clipart, I keep a copy of their terms & conditions, as well as their store logo.  When I create files to sell {or giveaway}, I include a page giving credit {with clickable links} to all of the stores whose clipart I used to make the file {see pic to the right}. Make sure that you follow the store's terms. They work really hard creating all of those cute graphics!
Where To Get Clip Art, Digital Paper & Frame
At first, this was the hardest part for me to create files to share. I struggled to find clipart that allowed me to use on products I was planning to sell. After some help from friends and digging around I found some really great artists! Etsy is great for locating inexpensive clipart! The stores also run special like buy 2 sets get 2 sets free {can't beat that!} Teachers Notebook also has a section that has teacher friendly clipart. Here are a few of my favorite stores!


                                                Saving Files
Both TpT & TN accept the regular types of files (word, excel, pdf, etc). However not everyone has these programs installed on their computer. It's usually best to use pdf. If you have a Mac, you're in luck! When you have your file completed go to File-->Print-->PDF (tab at the bottom)-->Save as PDF. {My files go to my desktop, but they may be placed in your documents instead}. If you have a PC, Primo PDF is a great program to use.  It's also a really good idea that you use PDF because **MOST** places that you purchase clipart require that you sell your files in a flattened format. This basically means that your file is one layer and someone can't right click and copy/save the image from your file.  PDF ensures that your file is flattened, programs such as word, excel, and powerpoint aren't. Someone could open those files - save the images and use them without properly paying for them. You also don't want people modifying what you created! Part 3 of these posts will include ways to ensure others can't make changes to your PDFs, as well as making them so that people can personalize them {& some other goodies}!


Only 1 more part to go!! I'll be posting the last part this Friday. Tomorrow I'm super excited about Tech Tip Thursday - it's one you don't want to miss!!


Tuesday, July 10, 2012

Opening A Teacher Store Tips & Tutorials - Part 1

A few weeks back, I was asking how I go about opening a teacher's store. I had tons of questions, but struggled to find the answers! I had some really great advice from a few people {thank you - you guys are awesome!} but honestly not a whole lot of people were forthcoming with wanting to share information. I then had a lot of people requesting I do a follow up with what I found since they wanted to know too....so here it is. I have so much info to share that I'm having to split it up in parts. And I am by no means an EXPERT...this is just what I have found through asking around & trial and error. Please, please, please correct me if I'm wrong about anything!

Choosing A Site to Sell Your Products
First steps first, you have to decide which site to use. I looked into the two main teaching sites: Teachers Notebook and Teachers Pay Teachers {There may be more but these are the two I am most familiar with} . Here is what I found, along with which one I ended up going with.

Teachers Notebook - You pay an up front fee of 19.95. After this you keep 100% of everything you sell {minus paypal fees} You don't have to pay listing fees or membership fees. Paypal has a few option plans that determine your rate, but I have found that it's around .30-.50 for each transaction. They accept the following file types: PDF, Excel, Powerpoint, Smartboard, Word and Zip {*Although you have to be careful with the terms of your clipart- I'll cover this more in part 2} It is highly recommended to use pdf or zip files for 1) easy & quick to download 2) not everyone has excel/ppt/word. One really great things is that the $ is in you paypal account {minus fees} immediately after someone purchases something. Here is their FAQ page.

Teachers Pay Teachers - To open an account with TpT is FREE for the basic acct, however there are fees that you will be accessed. The are 2 types of accounts - Basic which is free to sign up, but TpT keeps 40% of your sale + .30 fee for each sale. The premium account is 59.95 a year, but TpT only takes 15% and there are no other fees to pay. They give an example of a $5.00 transaction- Basic you  take home 2.70 and Premium 4.25. TpT offers a much wider range of file types including movies, music & photos. Once you upload your file, you have the option to upload a preview file {which is really nice} I have heard that uploading files is a little tricky {I don't know this first hand though, just what I've heard}. Also, their website makes it appear that you get your $ quarterly. Between the two, I feel that TpT has more of a driving force and is more widely known of the two. Here is their FAQ page.

What I chose:
I ended up going with Teachers Notebook. I was hesitant at first paying the 20$ up front, but after having my store for just a week, I've already made that back! I have found it super easy to upload files. While I can't upload a preview file, I can upload 4 images, which has been perfect! Even though TpT seems to be the more popular site, I'm not having that much trouble getting people to see my site. I highly suggest having multiple source outlets to advertise your files {twitter, pinterest, facebook, blog, etc} The only thing I wish was that TN had better categories, and that it allowed me to assign more to my files {but it does allow you to create your own categories} The paypal fees have ranged between .30 -.50...not bad except when you only sell 1$ item {but this is much more take home than going with the other site} To the right is a screen shot of the breakdown for what I've sold and what I get to take home after fees {hopefully will give you a better idea!} 


I hope this gives you an idea and helps you make a better decision for which one to go with. I tried to be as fair as I could...but like I said, I am pretty new to this and I'm only speaking on what I was able to find out. Now go check out my store....and let me know what you think! And watch out for part 2 of my tips & tricks of opening a store!

Monday, July 9, 2012

Monday Made It - Frames, Craft Room, Clipart & Math Centers

Ahhhhh Monday - Time to link up with Tara over at Fourth Grade Frolics! I've been a busy, busy bee {I saved my favorite and best for last}! Who would have thought that Monday Made Its would lead to me opening a store?!?! {I'm having a blast making new items!} This week I have gotten so much done!!!!

I'm in Texas and it has been too hot to even go swimming {seriously it's sad when the pool feels more like a hot tub than a pool!} So my daughter and I decided this week to go on a scavenger hunt {& stay indoors!} - looking for things at thrift stores to repurpose. We had an absolute blast...and I'm blown away by her creativity {she's about to be 9}


Our first find was a really cool frame from Goodwill. It was just a simple black frame that had a few scratches here and there. I knew exactly what I wanted to do with it. I've eyeballing these frames on pinterest where you can add wire/string and hang pictures from them. It was super simple! I primed it then spray painted it green. {The green wasn't as lime as I would have liked it to be....but it'll do} Then I used my stapler and stapled the wire going zig zag along the back. I wanted to add a little something extra so I attempted to add scrap fabric rosettes {leftover from my covered canvases} LOVE IT!!!! It fits perfect in the little reading corner of my craft room! Oh and I also made the covered clothespins with leftover scapbook paper from my magazine files! This project was super cheap! {you know I love cheap!} I got the frame for 6$, paint 4$, & wire 2$ total cost 12$!!!


Since I was working on my "reading corner" of the craft room, I decided to make one of those nifty "to do list" dry erase boards out of a picture frame. I got a giant frame {10 x 14} from Walmart. I just used leftover scrapbook paper from my magazine files & typed up a to do list check off sheet. Love it and can't wait to use it! The frame didn't have a stand in the back, so I used an old stand I had laying around. Total cost was 5$ for the frame...everything else I already had!


Ok....this is what I couldn't wait to share with ya'll. One of my goals this summer was to re-do my math centers. I've seen all of these cute acronyms like BUILD or TIME. I borrowed the idea of TIME because it went so well with the centers I want to have and made it my own!


As you know technology is very important to me! I wanted to make sure that there was a technology rotation in my centers. Here is what I came up with: T-Technology I-Independent Work M-Math Facts, E- Extra Review...and I added an R for Review with Teacher {Guided  Math} I cannot wait to use this setup!!!


I also did something I've never done before - I made clipart!!!! I could not find cute clipart for an alarm clock {I searched for hours I swear!} I finally got fed up and just made my own!! I have to say I'm pretty impressed with myself ;)


This post is already out of control, but I promise to post to soon to explain how I plan to use this set-up. If it's something you think you might like to use, you can get all the files  here! There a TON of resources included:
  • Binder Cover (2 choices)
  • Pocket Chart Header (2 choices)
  • Pocket Chart Labels
  • Center Bin Labels
  • Can Do/ Must Do poster 
  • Center Descriptions & Examples
  • Center Planning Sheet
  • Center Weekly Checklist

Friday, July 6, 2012

And the winner is....

I completely forgot about my questioning chips giveaway  (OOooppps!) I honestly thought it ended today! Congrats to my lucky 5 winners! Amanda, Kelly, Jana, Katie, & Mindy! They each won 3 of my questioning chips sets!


If you haven't checked them out...go now! I'm super excited about these learning tools! They are a wonderful way to get students talking and discussing various texts. I currently have 8 sets of chips {and adding more soon!} Non-Fiction, Pre-reading, Science, Character, After Lesson, Poetry, Fiction, and Connection questioning chips. Read about out how I will be using them in my class {and other ways they can be used}!


Differentiated Instruction - Choice Boards

Last summer I attended a GT training and was introduced to choice boards! I LOVE THIS IDEA!!! I think that students are more engaged and even challenge themselves more when they are given choices.  The great thing is....they aren't just for GT students. Choice boards work similar to tic-tac-toe; the student completes 3 activities in a row {up, down, diagonal} They can be adapted for ALL students and actually lend themselves well to differentiated instruction. On Tuesday, I will be attending another GT training specifically on choice boards and differentiated instruction {I'm super pumped about it!} I can't wait to learn more about these learning tools! {I promise to share what I learn!}

Choice boards can be set up in many different ways. You can base them off of abilities, learning styles, intelligences, and even levels of questioning. I have found it easier, if I focus on just one of these types. When creating the board, you want to plan out what type of activity each square will focus on. {You don't want to have 2 of the same type of activities in a row} The goal of the CBs are to have equally acceptable activities that you want the students to complete that are similar end products, but have varying ways to accomplish the final product. {For example, you are studying the Alamo. Students could choose activities from writing a diary from the viewpoint of being in the battle, recreating a model of the Alamo, creating a movie, etc.}The wonderful thing about CBs though...students can choose an activity they are willing to complete {taking into consideration their own likes/learning style/intelligence}, but they will have 2 other activities they will need to complete that will focus on other skills that they possibly may need to strengthen {but at the very least they're practicing other skills}! It's a win-win situation!

I recently put the choice boards I created for my homework reader's responses in my shop. My students are required to read 20 min nightly, however I found that many of them weren't really reading every night! These choice boards give student's different options to respond to their books, while focusing on varying skills. I've also included 4 blank {editable} choice boards so that you can create your own boards! .....And I used the adorable sneakers clipart to jazz them up from KPM Doodles {love her stuff!}


Here is an example template of how to begin creating a choice board based on Multiple Intelligences:
                                                       Source: Dare to Differentiate 

Here are some great resources:


Thursday, July 5, 2012

Tech Tip Thursdays - Student websites


Have you ever built a website? If you have...then you know the excitement you had the first time you built one {You're in complete and total awe that you were capable of building it!} Can you imagine how your students would feel if they had the chance to build one? If you haven't built one before, it's much easier than you think! There are some really great programs out there!

 Last year, I had a tech club that met after school. One of our first tasks was to create a website that served as our technology portfolio. The kids were beyond excited to be able to build one! Out of all of the projects that I taught, I have to say the kids were most excited about building a website. {The cool thing was that they continued working on their site even after our club ended!} This year I plan on having each of my students in class create one to serve as their project portfolio, but also so they may blog on their individual accounts.

I prefer to use the free program from Weebly. There are 2 parts to Weebly, regular service and the education division. If you sign up under the education division - you get a ton of extra services that are perfect for a classroom setup. You can create up to 40 student accounts, as well as multiple classes. {WOWSERS!!} Your account will be able to oversee and control all of your student accounts {the regular service doesn't allow for this!} You have the ability to make your students' pages public or private {so you could just keep the website within your classroom}....and you can even password protect it {how cool is that?!?}. Another feature that I like about Weebly, is that it's a drag and drop design program. You and your students don't need to know HTML or any other type of code. It's very user friendly to be able to design {here's a great intro video to the site} But hands down the best thing about weebly is it's free and NO ADS!!!

Just a few ideas to use Weebly in your classroom, besides using it for just a website/blog:
On another note, something that is very near and dear to me...it might seem like common sense to us, but we need to remind our students that everyone around the world can see what we put on the internet. We need to have discussions with our students about what is appropriate to post online and how we must keep ourselves safe by not posting information that identifies who we are. 

Tuesday, July 3, 2012

New Items Added to My Store - Need Teachers' Help....

I've added a total of 5 items {Yea Me!} to my store... and more are coming very soon! Right now I'm focusing on the learning chips - because I am loving creating them for my own classroom! I need some teachers to help me evaluate and rate my items! The first 5 people to comment on this post with their top choice of question chips they would like to check out - will receive their pick of chips in exchange for them to evaluate the items in my Teachers Notebook store {this part is very important, please, please, please don't take the files if you don't intend to leave feedback in my store!} In your comment, please leave your email address! I would like to thank you in advance for your help!

For everyone else....here are the files from my store. I'm so excited to use these chips this coming year with my students. Seriously I have so many ideas on how to use these, and I know the students are going to love using them!


 photo border_zpsru85kpjh.png