This will be my last post on teacher's stores...until I find more goodies to share. This post also won't apply to everyone because you may not have this program I'm going to share with you. However....check with your school district (school library), it may be provided and you just didn't know you had access to it! Most schools purchase this software as part of a package - so it doesn't hurt to ask.
The program I'm talking about is Adobe Acrobat Pro. This program is different than Adobe Reader (which just lets you view the file), this one actually allows to create, edit and do amazing things with your file! I have version 9, but 10 or X is the most current. As teachers we get a HUGE discount.
I've only discovered a few tricks I can do with this software, I'm sure there a ton more! So lets get to it!
Adding A Link
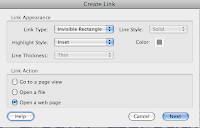
Like I mentioned in my previous post, I love to use PowerPoint to create my files, however when I convert them to PDF, I loose all of my links. This is really important for those clipart stores that require a clickable link back to their store. It's super easy too! Open your file in Adobe Pro, highlight the text you want to hyperlink, right click and choose create link. A box will appear - the picture shows the settings I choose, I prefer to not have a visible box around my links.
Click on "open a webpage" and another screen will pop up. You just enter the url and hit ok! Simple right?!?! You can also set it up a link to email you. Follow the same directions above, but for the url enter "mailto:youremail address". If you want to link an image, hover over the image until the cross-hairs appear {top left corner of the image} Click and highlight the entire image. Once it's highlighted right click and follow the steps above again to create a link! This makes it so much easier to not have to type out urls within your file, and definitely makes them look cleaner.
Adding Editable Fields
Have you ever created a file that really needs to be personalized for the buyer? This is perfect for binder covers, lesson plan templates, awards, etc. With Adobe Pro, it's super simple to add editable fields. Again open your file in AP {Adobe Pro}. On the top right click on Tools, then click on Forms. Under the form section, click on Create. A number of screens will pop up, 1st choose "Use current document", 2nd "Use current document". It will automatically go through your document searching for places a form field should be. Be careful - sometimes it recognized and places a field where one shouldn't be! Just right click and delete it. On the right hand side of your screen Task menu will appear. From here you can add a new field to create an editable text field. Just place the field wherever you are wanting the person to be able to change the text. When you place the box, there will be a link to properties.
In properties, I stick to the General and Apperance tab. Under general you can select if the field is required or not, also if it is visible. Under appearance, you can choose font and size that the field will use so that it blends with the document. Once you have your fields created and you've set the properties - you're done! Just save it! Now your buyers will be able to customize and enter their information into those fields! {Here is a video
to give you a visual}
Security
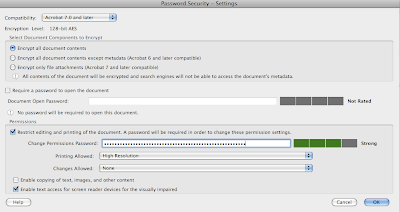
AP is amazing, so amazing that I can take a PDF and start editing it! I can add text, change things around, etc. Most people have the misconception that PDF means that no changes can be made and the file stands as is. This is a problem if you create similar products. Someone could buy one then make changes and recreate all of the others, then you're left without those sales! However AP also allows you to secure your document so this doesn't happen. When your PDF is finally done, you've added link and fields {if it's a customizable document} then you're ready to add your security. With your document opened in AP, click File > Properties. A box will appear, under the description tag, make sure you name is listed as the author. Then click on the Security tab. Under the pull down screen for security method, choose password security. Another screen will pop up - this is how I set my settings.
The first thing I click on is "Restrict editing, printing...." choose a password that you can remember but that is strong! Under printing, choose high resolution {you don't want someone to buy your file and can't print it}. Under changes allowed, I choose none - that means text & images can't be selected, they can add text/images, or add/delete pages - basically they can't change my document in any way shape or form. Now if you added text fields for your document to be editable, you will have to choose "filling in forms" under changes allowed - or they won't be able to edit the fields ;) I leave copy text/images unchecked, but I do allow for screen reader devices. Click ok and another screen will pop up prompting you to enter the password again to confirm they are the same. Make sure you save - otherwise your security settings don't save!
That's it folks! The little tips & tricks I've learned so far on this adventure of opening my store. I'll say it again - I am no EXPERT, this is just what I've picked up through my searches and trying to teach myself along the way. There may be a better way ;) I hope this helps ya'll and you decide to take the plunge! Do it - open a store and share your wonderful ideas!


LOVE IT!!! Thank you for sharin'! It helped me figure some things out :)
ReplyDeleteThank you for sharing. So nice to have some of the work figured out.
ReplyDeleteJessica
Teach on a Limb
This comment has been removed by the author.
ReplyDeleteGreat posts! I use power point too! I'd love to have the more advanced Adobe software! I might have to break down and buy it...
ReplyDeleteJackie
Third Grade's A Charm
I'm honestly not sure - I just happened to have pro through my district so it's what I played around with. I'm sure you could call their customer service and make sure ;)
ReplyDeleteI also have the security options with Primo, too! I use that and it's free!
ReplyDeleteRachel
Thanks for sharing I also saw this cute idea and immemdiately pinned it! This is so simple and cute and is so visual.
ReplyDeleteI just love itI have a blog going and i would appreciate it if you could add it to your list.
http://myblogcelebrities.blogspot.com
Thank You!
Jessica Myers
The Hollywood Gossip
Thanks for sharing valuable Information, I really very impressive on your blog.
ReplyDeleteDo My Assignment
Ensure your learning places have clear destinations, straightforward bearings, and, if suitable, examples of the sort of work or action understudies will make there.
ReplyDeleteWHAT'S UP, I READ YOUR BLOGS, YOUR WRITING SKILL IS SO GOOD, KEEP IT UP!
ReplyDeleteThanks for sharing This is really inspiring and I love to read more about this.
ReplyDeleteMarvelous, what a web site it is! Thanks you
ReplyDeleteIt’s very simple to find out any matter on net as compared to books, as I found this post at this site.
ReplyDeleteI appreciate, result in I found exactly what I used to be taking a look for.
ReplyDeleteGod Bless you man. Have a nice day. Bye
ReplyDeleteMerely wanna remark that you have a very nice internet site
ReplyDeleteAwesome motivating article. I am practically satisfied with your great work.
ReplyDeleteThere’s definately a lot to know about this issue. I really like all the points you made.
ReplyDeleteI really appreciate all the hard work you put into this great site. Thankyou so much..
ReplyDeleteThis article is very informative and helpful. Thanks for sharing
ReplyDeletePay a quick visit this website, it includes valuable Information here. Goodluck!
ReplyDelete